Services
By utilizing multi-level service categories, it is possible to generate personalized services. With a well-organized interface, it is simple to classify business services. The service Module has been developed with the most up-to-date design and technology to ensure ease of use.
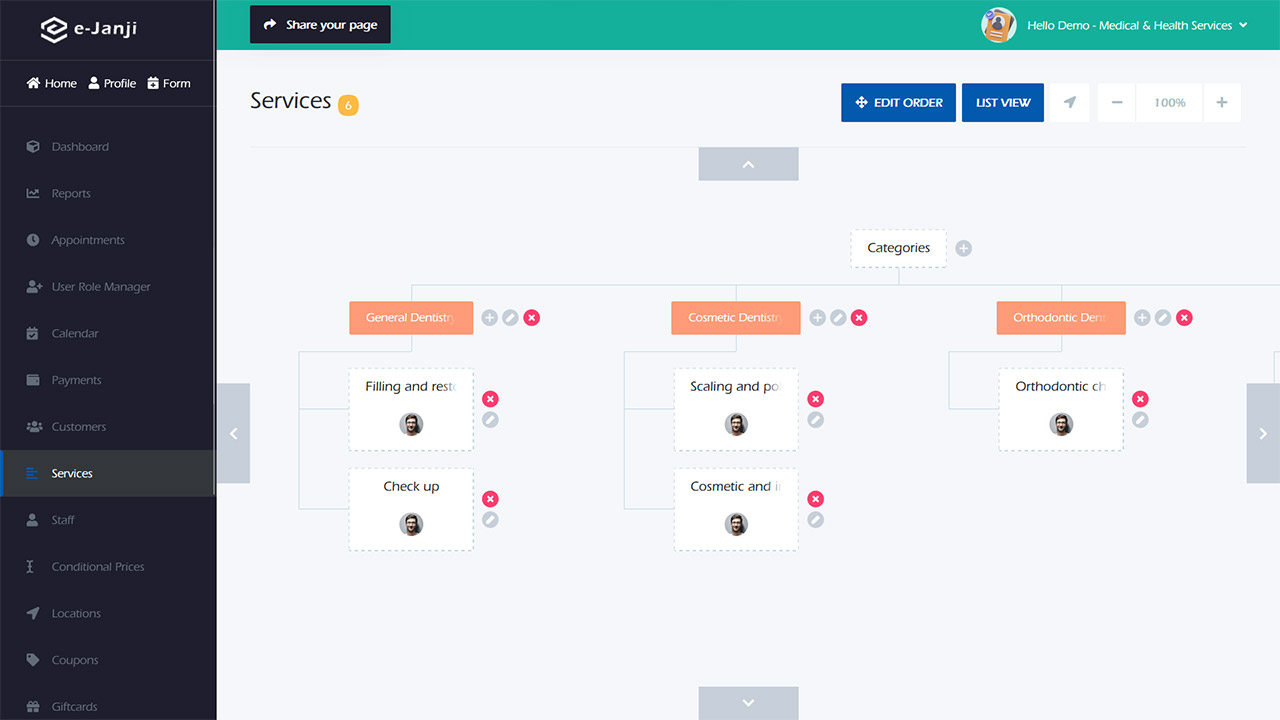
To obtain a user-friendly visual representation, one can manipulate the service structure by using a mouse to navigate in any direction, similar to a map. Additionally, the map allows for zooming in and out. In the event that the center of the map is misplaced, there is a button adjacent to the zooming button that can automatically reposition the map to its center. To begin, the creation of a category is necessary. This can be achieved by selecting the “+” icon located in front of the Categories section on the screen’s center. After entering the desired category name, clicking on the Save icon will finalize the creation process.
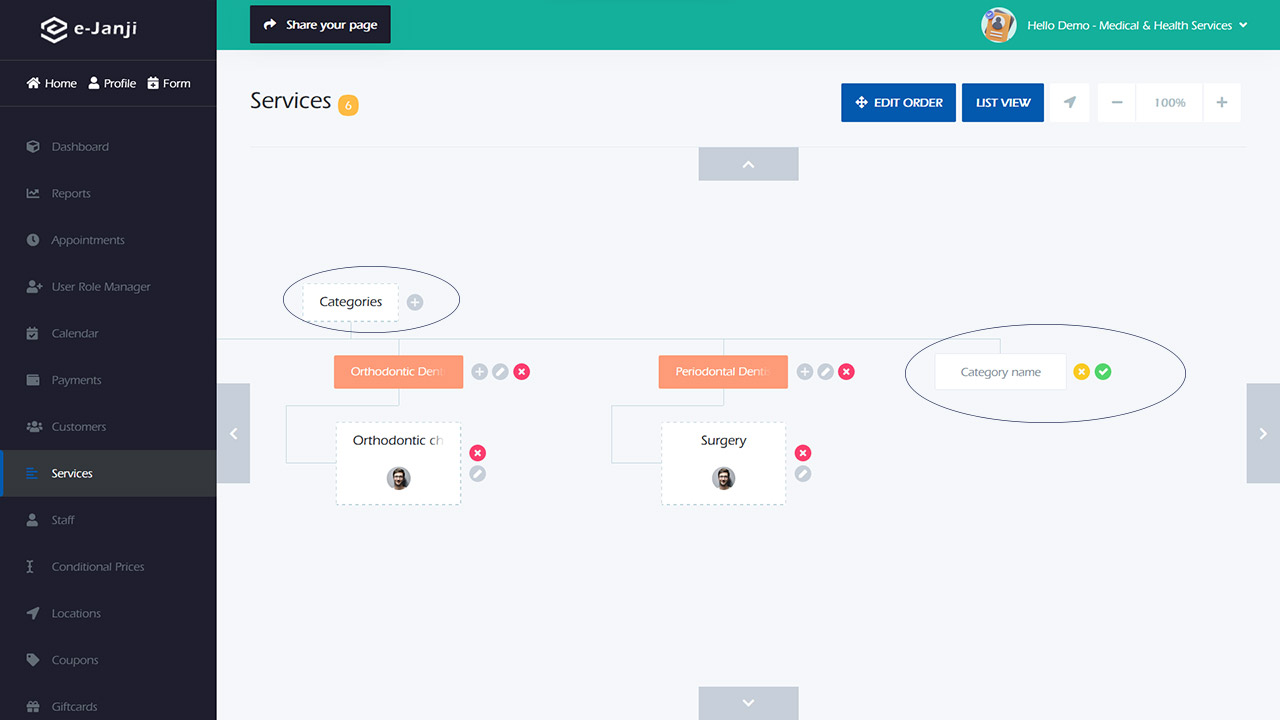
To incorporate an additional category, you have the flexibility to replicate the aforementioned procedure as frequently as required. The number of categories and services that can be included is boundless, allowing for utmost versatility and customization.
To include a subcategory under a Category, simply click on the “+” symbol located beside it. A prompt will appear, asking you to choose between adding a Category or a Service. Opt for the Category option and input the name of the subcategory to save it.
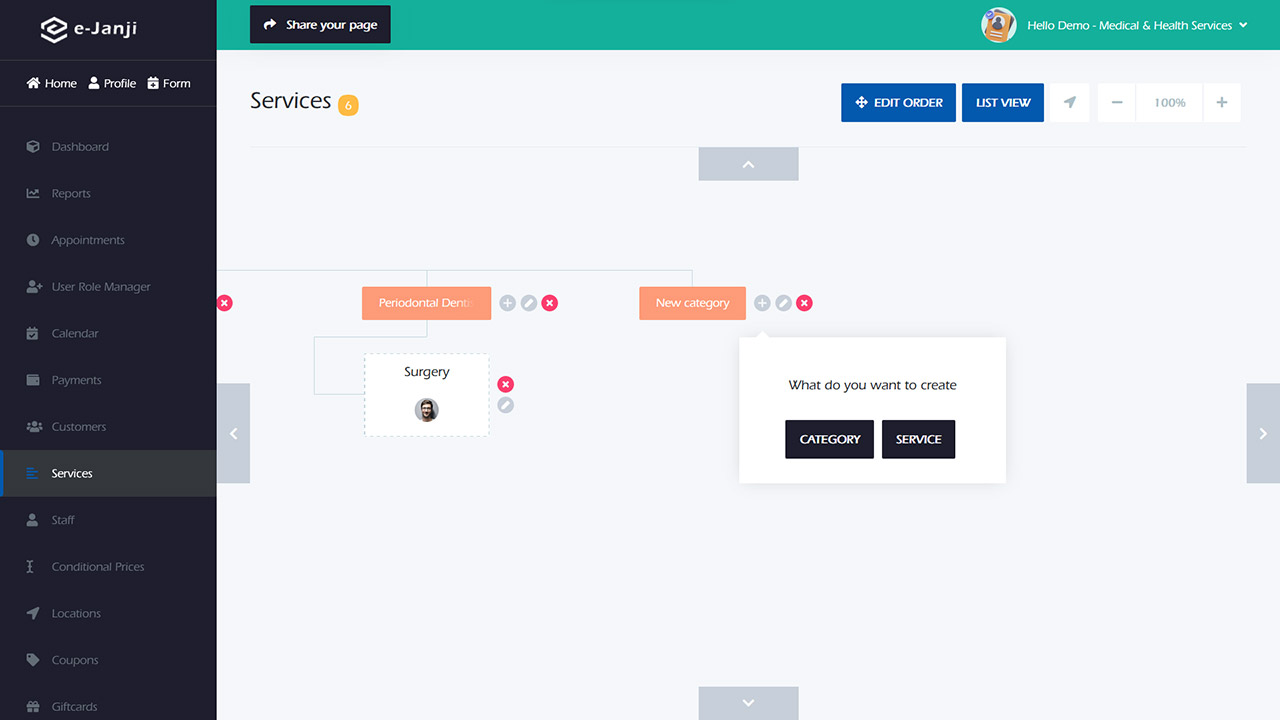
To incorporate a service into a subcategory or category, simply click on the “+” symbol and choose the desired service option.
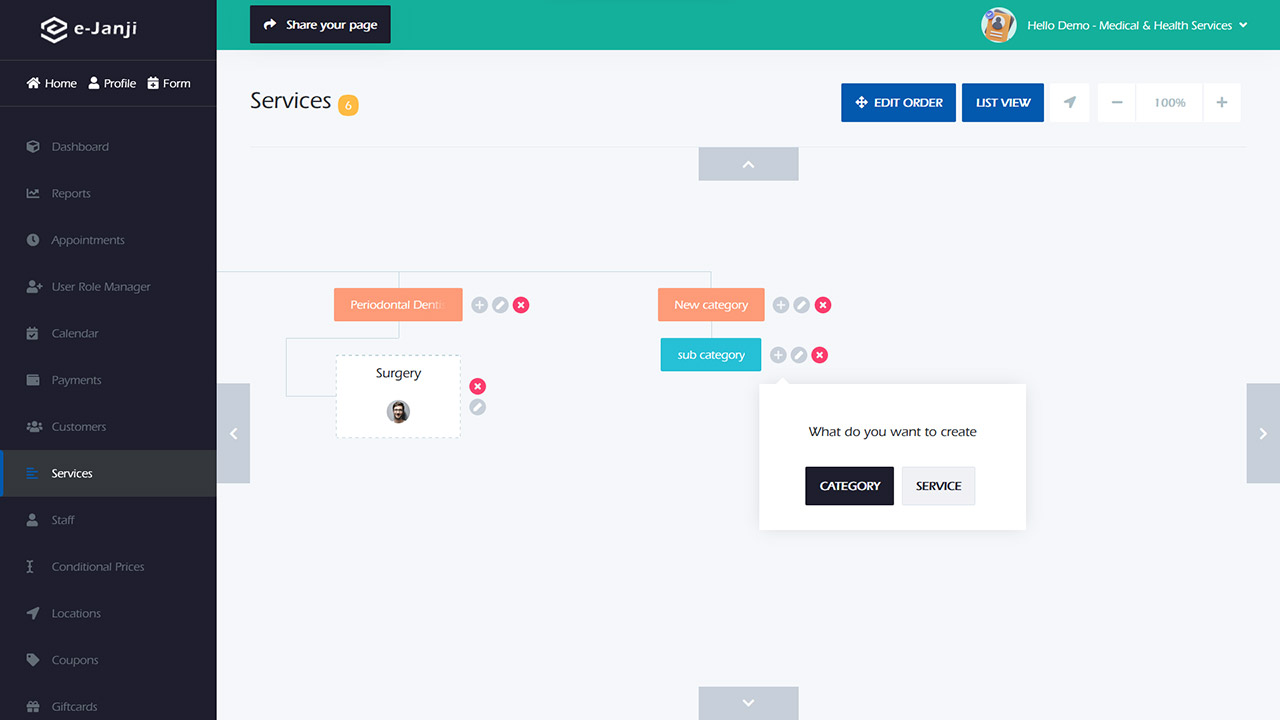
To include a service, a fresh modal will appear.
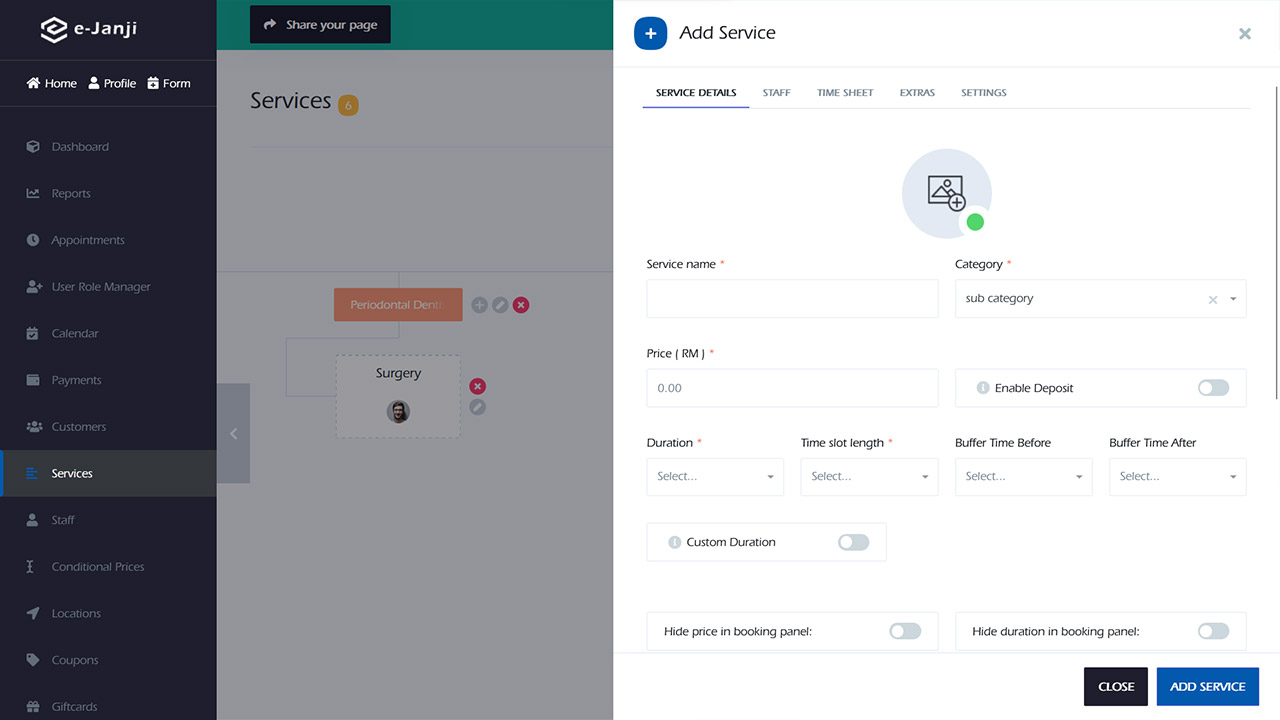
You need to check all four tabs and fill in information according to your Service.
- SERVICE DETAILS
- STAFF
- TIMESHEET
- EXTRAS
First, you need to fill in the primary information in the Service Details tab.
The Service Image feature allows you to include an image that will be displayed to your customers during the Front-end booking process. This image helps to visually represent the service you are offering, making it more appealing and enticing for potential customers.
When creating a service, you can input a name for it in the designated Service name input field. This name will help customers easily identify and differentiate between different services that you offer.
The category of the service will be automatically inherited based on your predefined settings. However, if you need to make any changes to the category, you have the flexibility to do so.
In order to provide transparency to your customers, you need to specify the price of the service. The currency does not need to be mentioned here as it is selected in the settings. For example, you can simply input the price as 50.00.
To ensure accurate scheduling, you need to specify the duration of the service. The available options for duration will be determined by the Time slot length that you have defined in your General Settings. For instance, if you have set a time slot length of 10 minutes, the options for duration will appear at 10-minute intervals, such as 10m, 20m, 30m, 40m, and so on.
If you require some additional time before starting the service, you can set a buffer time before. Similar to the duration, the time interval for the buffer time will be determined by the Time slot length that you have specified.
Likewise, if you need some additional time after finishing the service, you can set a buffer time after. This allows you to account for any necessary post-service tasks or preparations.
In case you want to offer recurring services, you have the option to activate this feature. Enabling recurring services allows customers to schedule and book the same service on a regular basis, providing convenience and flexibility for both you and your customers.
A recurring service refers to a type of service that is not limited to a single appointment or occurrence. Unlike non-recurring services, which have a specific start and end time, recurring services involve multiple visits or treatments over a period of time. For instance, when receiving treatment from an eye doctor, there may be a need for ten days of continuous care, requiring patients to visit the clinic regularly during this period. By activating the recurring service option, additional choices related to recurring services will become available. However, if you do not have a recurring service, you can disregard this particular section of the instructions.
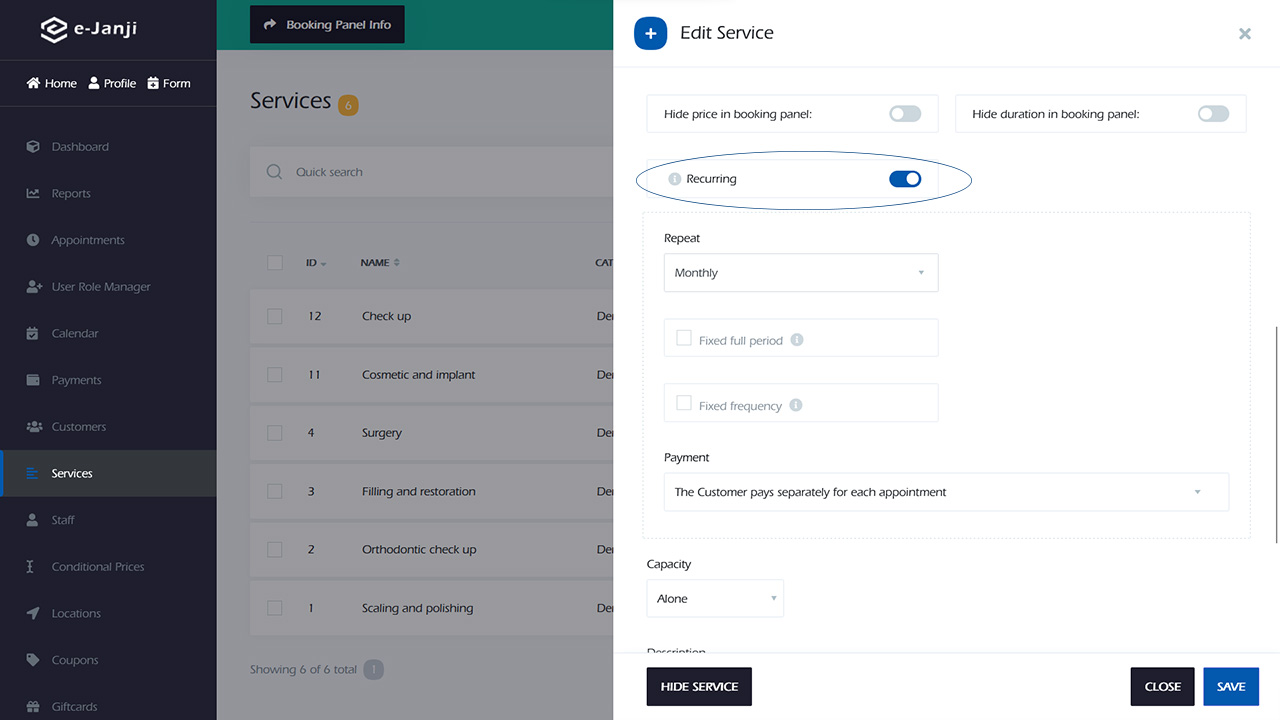
Repeat: You are required to determine the frequency at which the customer will utilize the Service. There are three available options to choose from.
- Monthly
- Weekly
- Daily
The Monthly Recurring Service allows customers to choose specific days of the month or days of the week for their repeated service. This option provides flexibility for customers to select recurring appointments on particular days, such as the first Sunday, the last Wednesday, or the third Friday of every month.
If your Service is scheduled to occur on specific days of the week, you can choose the Weekly Recurring services option. This allows you to set a recurring pattern for your Service, such as it being repeated on the 1st, 3rd, or 5th day of every week.
If your service is performed on a daily basis or at regular intervals of N days, it is advisable to choose the Daily option for scheduling.
By selecting the fixed full period option, users have the ability to restrict the duration of recurring services. For instance, if a treatment requires ten days to complete, this option can be enabled and the duration can be specified as ten days. Additionally, apart from the day option, there are alternatives available for selecting the duration in terms of month, week, and time(s). However, if this option is not activated, customers will be required to indicate the desired duration of the service at the time of booking.
The Fixed Frequency option allows you to determine the frequency of repetition. By enabling the Monthly Recurring Service and selecting five specific days in a month, your customers will be able to choose those five days for their bookings.
By incorporating a Weekly recurring service and specifying a Fixed Frequency of three days per week, customers will have the flexibility to choose only three specific days for their bookings. However, if you choose to disable this option, there will be no restrictions imposed on customers regarding the days they can select for their bookings.
When making a booking, you have the opportunity to select your preferred payment method for recurring services. You can choose between two options to determine how your payments will be made.
The first option suggests that customers are required to pay solely for the initial appointment. On the other hand, the second option states that customers are obligated to pay for all appointments within the series.
If you wish to receive payment solely for the initial appointment, you have the option to choose the first selection. However, if you opt for the second selection, customers will be obligated to pay for all subsequent appointments in advance when scheduling a recurring appointment.
The Capacity feature allows you to choose between two options for your customers to subscribe to the Service. If you want them to book individually, you can select the Alone option. Alternatively, you can choose the Group option and specify the maximum number of customers that can attend together.
Please provide a concise Description of the Service. This information will be displayed to the customer during the Front-End booking process.
Within the STAFF section, it is possible to include individuals who are employed in the Service. By simply clicking on the “Add employee” button, one can select the desired employee. In the event that the current Service necessitates a distinct price for the employee, it is necessary to mark the “Specific price” option and input the designated price for that particular employee.

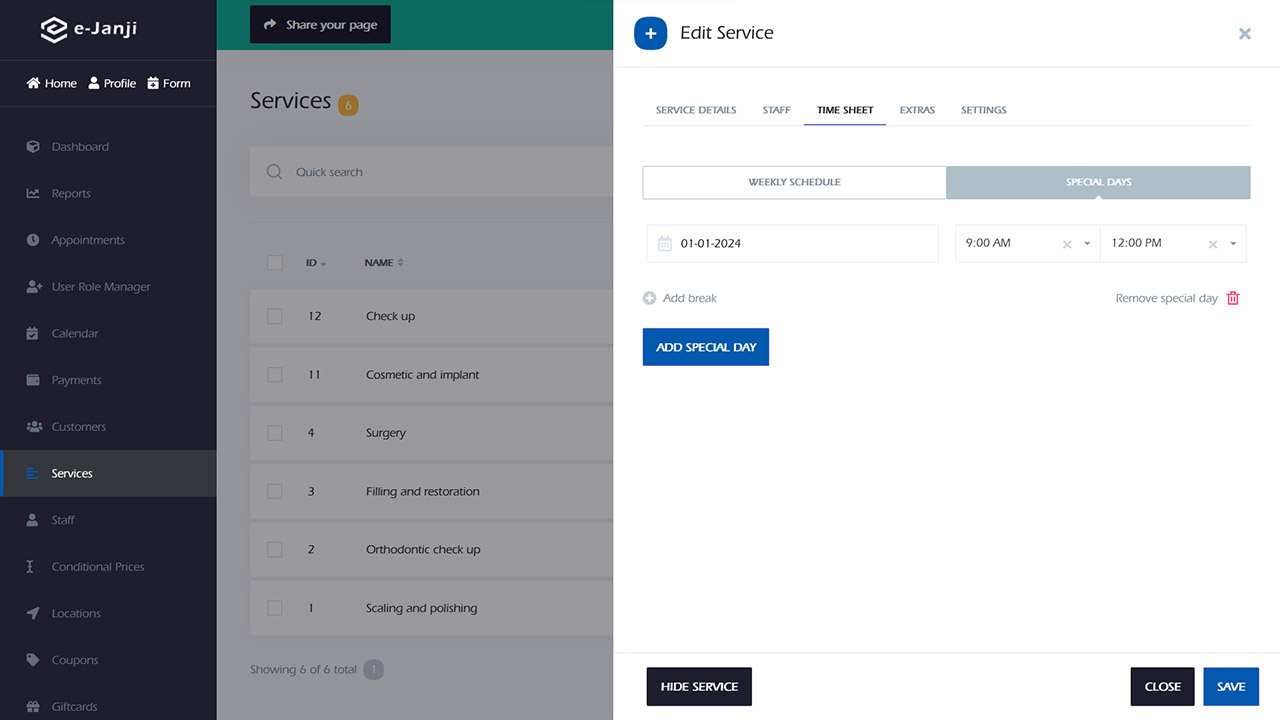
Within the TIMESHEET section, it is possible to establish a unique timesheet for your Service. By default, the timesheet that is configured in the Settings > Business hours section will be displayed in the user interface. However, if you require distinct timesheets for the Service, you will need to enable the “Configure specific timesheet” checkbox and specify the applicable Timesheet for the Service.

In the event that the timesheet for your service varies on different days, you have the option to include or exclude it from the SPECIAL DAYS submenu. By simply clicking on the “Add special day” button, you can select the specific date and specify the starting and ending hours. For instance, if a particular day is considered a non-working day for the Business, but appointments still need to be scheduled for this service, you can add those days in this submenu. Conversely, if it is a working day for the Business but appointments should not be scheduled for this service, you can achieve this by adding the date of the day without selecting any time interval. Consequently, the day will be marked as busy.
Within the EXTRAS section, you have the option to incorporate supplementary items to enhance your Service.

Please provide the name and price of the extra service. Additionally, you have the option to include an image of the extra service. When a customer adds an extra service, the duration of the extra service will be added to the overall duration of the appointment. Some extras may be sold without a specific duration, in which case the duration field should be left empty. Furthermore, you have the ability to set a maximum quantity for the extra service.
In order to assign a particular payment method to your services, you can access the SETTINGS section of the service. This functionality proves to be useful when you wish to utilize a distinct payment method for any of your services, thereby distinguishing between the services that necessitate online payment and those that do not.

Once you have finished creating all the necessary content, you will have the option to click on the “ADD SERVICE” button in order to include the desired service.