Supercharge Your e-Janji Booking System with WhatsApp Notifications via OnSend.io

In today’s fast-moving world, customers expect real-time updates — and WhatsApp is one of the most effective channels to reach them instantly. If you use e-Janji to manage appointments and bookings, you can now integrate it with OnSend.io to send automated WhatsApp notifications such as confirmations, reminders, reschedules, and cancellations. This not only improves customer engagement, but also reduces no-shows and keeps your staff in the loop.
What Is OnSend — And Why Use It with e-Janji
OnSend.io is a WhatsApp automation platform that connects to your own WhatsApp number (or a business number) and provides an API for sending messages.
By integrating OnSend with e-Janji, you can:
- Automatically send WhatsApp notifications when appointments are made, rescheduled, or cancelled.
- Use your own WhatsApp device, keeping things personal and trustworthy.
- Program the content of each message (Dynamic contents like date, time, customer name, staff name).
In short: more timely communication, better customer experience, and less reliance on manual messaging.
Before You Begin — What You’ll Need
- An active e-Janji account.
- A WhatsApp number (this can be a personal or business number) that is connected to OnSend.
- An OnSend.io account — you can use either a free plan or paid one depending on your needs.
Step 1: Sign Up at OnSend.io
- Visit OnSend.io
- Click “Sign Up Free” and create your account.
- Log in to access your OnSend Dashboard.
Step 2: Connect Your WhatsApp Number
- In the OnSend dashboard, go to Devices → Add Device.
- Scan the QR code using your WhatsApp app (linked devices).
- Once connected, the status will show “Connected”.

Step 3: Get Your API Key
- Go to OnSend dashboard.
- View the device , copy the token. You’ll use this token inside your e-Janji settings.

Step 4: Configure Webhook in e-Janji
- Log in to your e-Janji account.
- Go to Workflow → Create New Workflow
- Choose Send HTTP(S) request from Select Action options as your sending method.
- From URL, select “POST“. Paste the OnSend Webhook URL: https://onsend.io/api/v1/send
- Add new header, enter “Authorization“, and set the value to “Bearer TOKEN“, where TOKEN represents your OnSend device token, for example, 9cc97a40db218abb3f25d7c6c728e2ed8…..
- Select Content type; there are two types (Form data and JSON) with examples shown below.
- Click Save button.
From now on, every booking event (new booking, reminder, cancellation, etc.) will trigger e-Janji to send a notification payload to OnSend.
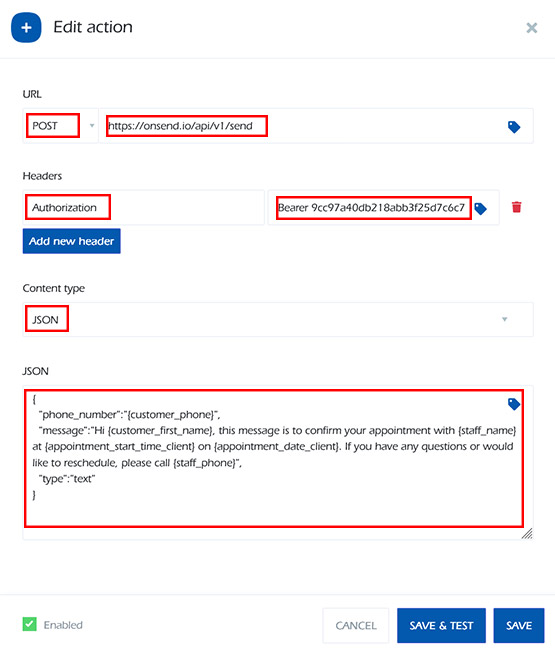
Example Notifications: Content type → JSON
Here are sample payloads e-Janji sends to OnSend for different events. You can add Dynamic content when making your messages.
For more JSON sample code or content, please visit our knowledge base as follows:
- JSON Sample Code – Appointment Confirmation
- JSON Sample Code – Appointment Reminder
- JSON Sample Code – Appointment Rescheduled
- JSON Sample Code – Appointment Cancellation
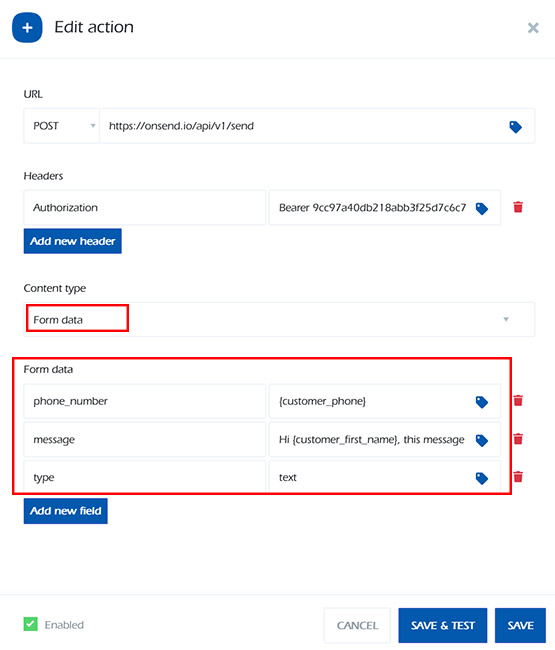
Example Notifications: Content type → Form Data
Like the JSON Content type, the POST URL and Header remain the same; the only difference is that the content type is set to “Form Data,” allowing you to easily include any Dynamic content in the form.
Remember that the form data must remain the same:
- phone_number
- message
- type = text
Troubleshooting & Tips
- Ensure your WhatsApp device in OnSend is always connected.
- You can check webhook delivery logs in both e-Janji and OnSend dashboards.
Here are some common checks and best practices to ensure your WhatsApp notifications run smoothly:
Connection Issues
- Make sure your WhatsApp device in OnSend stays connected and online. If it disconnects, no messages will be sent.
- Refresh your OnSend dashboard and re-scan the QR code if the device shows as “Disconnected”.
Message Delivery Problems
- Verify that your Webhook URL in e-Janji is correct and active.
- Ensure that phone numbers use the correct international format (e.g., `60123456789` for Malaysia).
- Check the OnSend Messages section to confirm that the message status is Success.
Data & Template Mapping
- Double-check that the Dynamic contents in your e-Janji message are correct.
- Use the example JSON payloads above to verify your data structure.
- Always run a test booking before going live.
Support & Resources
- OnSend.io FAQs: https://onsend.io/#faqs
- OnSend Tutorials: https://onsend.io/tutorials
- e-Janji Support: support@ejanji.com
If all settings are correct and your WhatsApp device is active, e-Janji and OnSend will work together seamlessly to deliver instant WhatsApp updates to your customers and team.